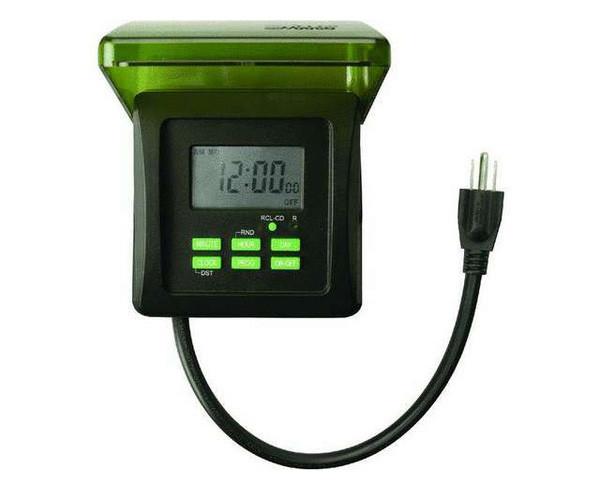
How To Program Fawn Lake Fountains Heavy Duty Digital Timer Instructions
Fawn Lake Fountains Heavy Duty Digital Timer Instructions is a perfect companion for your Fawn Lake Fountains. It gives a relief from the manual plug and unplug activities of your fountain. It is very easy to install and programmed. It has lots of features which make it better than the other digital timers.
The key features of this Fawn Lake Fountains Heavy Duty Digital Timer
Instructions are:
- 3-prong grounded outlet
- 7-day, up to 20 programs (on/off functions)
- Random on/off functions
- Battery backup for saved settings
- Manual on/off
Once you purchase the Fawn Lake Fountains Heavy Duty Digital Timer Instructions, the main thing that comes into your mind is"How to program it." So we are sharing instructional manual to help you in programming your digital timer easily by yourself.
Instructions:
Charge the Battery: The first thing that you have to do is to charge the battery of the timer for around 10 minutes from any charging socket available in your house. After that, unplug the timer from the socket and hold it in your hands for programming.
Clear the Memory: Press the R button with a toothpick to erase any previous settings.
To Set the Current Time: Press and hold the CLOCK button. At the same time, press the HOUR and MINUTE button as many times as necessary to advance the display to the correct time. Hold down the DAY button until the display shows the correct day.
To Program the Timer:
Press the PROG button once to display the first ON/OFF setting “1 ON -:–“.
Press the MINUTE and HOUR buttons as necessary to set the ON time you want. To change from AM to PM toggle 12 times.
Press the DAY button as necessary to choose the day or group of days you want for the time setting.
Press the PROG button again to display the second ON/OFF setting “1 OFF —“.
Repeat the procedure to create the OFF setting. Repeat Steps 1 thru 5 for additional ON/OFF settings. Press the CLOCK button to exit program setting mode.
Review On/Off Settings: It is important to review all 20 settings, even if you only used a few, to make sure there are not extra, unintended settings. Press the PROG button (hold down to scroll) until the display cycles through all 20 ON/OFF pairs. Stop on any setting you want to remove or change.
To Revise a Setting: Press the PROG button (hold down to scroll) until the display shows the setting you want. Press the HOUR, MINUTE and DAY buttons as necessary to revise the displayed ON/OFF time and day(s).
To Remove or Restore a Setting: Press the PROG button (hold down to scroll) until the display shows the setting you want to remove or restore. Press the RST/RCL button. If removing, the display will replace the setting with dashes. If restoring, the display will show the previous setting.
To Connect/Operate the Timer: Plug device in to the timer and turn the device on. Plug timer into wall outlet.
To Override the Timer: Press the ON-OFF button as necessary to display:
“ON” – the plugged in device is switched on permanently.
“OFF” – the plugged in device is switched off permanently.
“AUTO” – the plugged in device follows your programmed timer settings.
Random Setting Security Feature: When the timer is in AUTO mode (“AUTO” shows in the bottom center of the display) press the CLOCK button once. Then press and hold the HOUR-RND button for 3-5 seconds. “RND” will appear next to the minute on the display. The random setting function will turn the plugged in device(s) on and off at random. The device will turn on for about 10-26 minutes and turn off for about 26-42 minutes at random. The random function will override any on/off preset programs. To cancel the random function, press and hold the HOUR-RND button again for 3-5 seconds and the “RND” will disappear from the display.
Countdown Setting: Press the PROG button (hold the button down to scroll) and cycle thru all 20 settings until you reach the countdown setting “d ON —-” or “d OFF —-“. Press the HOUR and MINUTE button(s) to set the countdown time. Press the CLOCK button, then press and hold the RCL-CD button for 3-5 seconds to activate the countdown function. “CD” will flash in the lower left corner. After the countdown period is over, the device will turn off. To turn off the countdown function press and hold the RCL-CD button for another 3-5 seconds when in the CLOCK mode.
Daylight Savings Time Feature: Press and hold the CLOCK-DST for 3-5 seconds to advance the time of day one hour for daylight savings time. “DST” will appear to the right of the minute on the display. Press and hold the CLOCK-DST button again to set the time back one hour and “DST” will disappear.


Comments
Post a Comment